In today's digital world, technologies have intertwined with our lives, both personal and business, ranging from providing convenience, saving money, and even helping to improve our daily activities. As the popularity of mobile phones and tablets continues to rise, so does the demand for apps that can be used on those devices. As such, software and IT businesses see this field as a lucrative one, thus prompting many to build mobile applications.

Statistical analysis has revealed that in 2023, mobile applications are projected to generate more than $935 billion in revenue. Therefore, businesses nowadays strive to build a mobile application and make a bundle of money on their own or with the backing of a software services company. Apple's iOS platform is one of the most popular operating systems in use today and has become a significant focus for app developers who want to cater to the needs of as many users as possible. With its easy-to-use tools, streamlined process, and intuitive interface, developing an app for iOS has never been easier. If you're one of those wanting to create an app for iOS – this guide may be your ideal roadmap.
Why build iOS applications?
Building an iOS application is a great way to reach a large audience, with Apple boasting over 1.5 billion active devices in 2021. As such, the potential for generating revenue through iOS applications is huge and one of the main reasons why app developers choose this platform. Furthermore, it provides stability and reliability, which ensures that users get high-quality experiences when using their apps; this also helps increase user satisfaction and loyalty towards the product. Moreover, by building an application for iOS, you are able to leverage Apple’s brand value, its tech infrastructure, as well as a number of other advantages to create and promote your product.
What do you need in order to build an app?
Before you can begin building your iOS application, a few things need to be taken care of first:
- An Apple Developer Program. It is a requirement to have an Apple Developer Account in order to build and publish apps on the App Store.
- A Mac computer is running the latest version of Xcode, Apple's official development environment for creating iOS applications.
- Experience designing user interfaces (UI) and coding in Swift or Objective-C languages are also highly recommended.
Simple steps to follow to build a functional iOS application from scratch

To begin with, you should have a clear vision and understanding of what your app does and who will be using it. You do not need any coding experience, as there are various no-code solutions available that will enable you to create an app without having to write any code at all. Together with this, Apple has specific guidelines and rules related to how apps should look, feel and perform, which must be followed when submitting an application.
The following are steps to guide you through the process of building and launching an iOS app:
- Step 1: Research and planning - Before you start coding, it's essential to do your research and ensure that there's a market for your idea. Ask yourself why people would want to use your app and how you can make it better than similar products on the market. This will help you refine your concept and come up with an effective plan for building your app.
- Step 2: Choose your idea – Start by brainstorming ideas. What is the purpose of your app? What problem is it trying to solve? How can it make life easier or better for users? Once you have a few ideas, research existing apps in the App Store and ensure that yours is unique or at least not too common.
- Step 3: Know your target audience – It is time to clearly define your target audience before you start developing your app. Knowing who your users are will help guide the design process, so be sure to include demographic info, such as age, gender, location, and interests, in your research.
- Step 4: Design your interface – An intuitive user interface (UI) plays an essential role in making your app successful. Think about how users will interact with your app and build a design from there. Pay attention to small details like fonts, colors, and features. Additionally, consider using storyboards or wireframes to communicate your ideas to developers. A branding agency in New York can help you with this step.
- Step 5: Develop the app – Once you have a clear idea of what your app should look like, it's time to start coding. If you don't know how to code, there are many options for hiring experienced app developers who can write the code for you. Make sure that they use Apple's official programming language, Swift 5 or higher, which is optimized for iOS devices and offers improved performance and reliability.
- Step 6: Test and optimize - After developing your app, it's important to test it thoroughly and ensure that everything works as expected. Take advantage of Apple's testing tools like Xcode or TestFlight to help identify bugs and improve the user experience (UX) before you launch your app. Take the time to optimize the performance of your app and make sure that it works on all devices.
- Step 7: Submit your app - The final step is submitting your app to the App Store. This process involves filling out information about your app and creating a page in Apple's App Store Connect portal. Once you've filled out all of the required fields, upload a version of your application and submit
Good luck, and have fun creating your app. With the right research, planning, and development skills, you can create an iOS application from scratch. Remember to always stick to Apple's guidelines so that your app is approved for the App Store. Always keep in mind that developing a successful mobile application requires critical thinking, creativity, and attention to detail. Don't be afraid to experiment with different ideas and design techniques until you find something that works best for your users.

Guide to Installing Android Apps on PC: Emulators and Alternatives
If not, at least you will be able to come across an amazing Android app that can't be had on a PC, or perhaps an app will be liked and the best from the increased performance and space display that the computer offers. Running apps on your PC allows you to enjoy the bit advantage of a number of things: boosting productivity, gaming pleasures, or even exploring new applications on an expanded environment.
The Importance of Branding in Web Design
Branding plays a pivotal role in shaping a company's identity and fostering connections with its audience in today's digital age. As businesses vie for attention in a crowded online marketplace, the role of web design in conveying a brand's essence and values has become increasingly significant.
Mastering the Art of Audio Upmixing
UniFab Audio Upmix AI is revolutionizing the way audio production is approached in various industries. By utilizing cutting-edge artificial intelligence technology, UniFab Audio Upmix AI offers a unique and innovative solution for upmixing audio content to deliver superior sound quality.
Revolution on the Used Device Market: How Automation is Leading the Way
The main trend in the used device market is automation. All processes that are done manually have one common drawback: human errors.

How many eSIMs can be used in iPhone?
Are you looking to streamline your mobile experience with an eSIM for your iPhone? The advent of eSIM technology has revolutionized the way we connect, allowing for a more seamless and efficient use of our devices. With an eSIM iPhone, you can forget about the hassle of physical SIM cards and enjoy the benefits of multiple network plans on a single device. But how many eSIMs can an iPhone support? And how do you go about adding an eSIM to your iPhone? In this article, we'll dive into the ins and outs of eSIM capabilities on your SIM iPhone, providing you with a step-by-step guide to getting set up. Keep reading to unlock the full potential of your iPhone with eSIM technology and learn how to enhance your connectivity with ease.
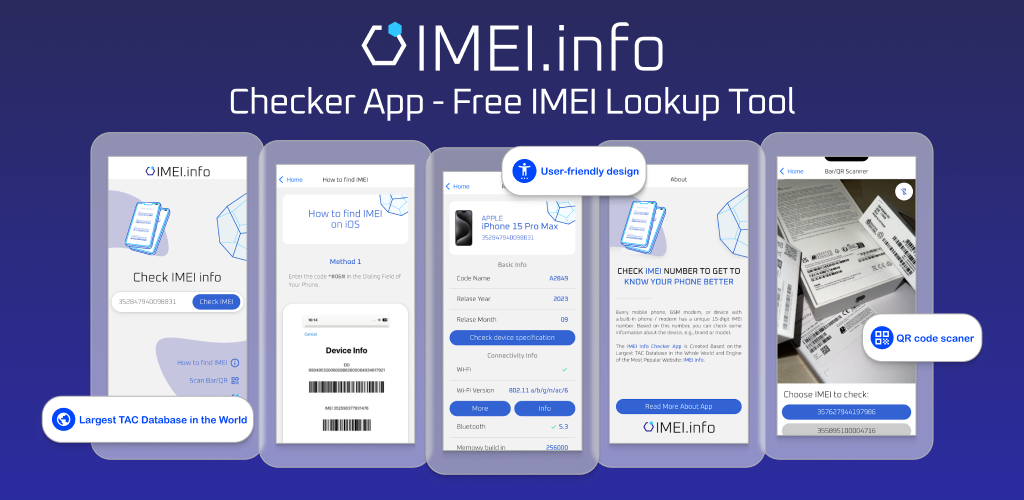
IMEI Info Checker App
The awaited moment has arrived! After a period of anticipation, we take immense pride in announcing the launch of the IMEI Info Checker App, marking a pivotal moment in accessing concealed mobile device information. In today's digitally intertwined landscape, understanding your device's nuances is pivotal. This long-awaited unveiling undoubtedly simplifies access to concealed information about any mobile device. Soon available on the App Store for iOS and the Play Store for Android, this app promises a transformative shift in how users interact with their device data.
iPhone GSX Check
Are you seeking essential details about your iPhone's carrier network, warranty status, and other critical information? The iPhone GSX Check provides comprehensive insights into various aspects like simlock network, Find My iPhone status, warranty info, and more.

eSIM Quick Transfer - All You Need to Know
In the ever-evolving landscape of smartphone technology, eSIM (embedded SIM) has emerged as a game-changer, offering greater flexibility and convenience for users. One of the latest innovations in this realm is the eSIM Quick Transfer feature, which streamlines the process of transferring eSIM profiles between devices. Whether you're an iPhone aficionado or an Android enthusiast, understanding the ins and outs of eSIM Quick Transfer is essential for maximizing the potential of your mobile experience.


Hallo